Table of Contents
Dashboard
In the dashboard the following matare captured for the admin.
- No of Pending Orders
- No of Active orders
- No of Delivered Order
- No of Customer Cancelled orders
- No of Restaurants
- No of Categories
- No of Revenue
- No of Promotions used
- Revenue :- revenue graph is filtered according to date
- Order Trend:- Order graph is filtered according to date
- Recent Active Order and Recent pending Orders are also shown for quick actions

Menu
In the menu section, admin can define categories and their corresponding subcategories that will be available on the platform.
Admin can assign these categories to restaurants while onboarding them on the platform. The restaurants can add/update subcategories and products inside them but not the top-level categories.
Adding a category
Inside the menu section, admin can add categories by selecting the + icon present in the categories column

A category is defined by name, tax, description, and image for both web app and app.
This tax %age is then used to calculate tax in bill breakdown while you place an order.

Adding a subcategory
You can add subcategories inside a category by selecting a category and then click add subcategory option below the category column.
A new subcategory is created by providing name, description, image for web and mobile

The category dropdown can be used to define under which category this subcategory will fall. You can change it by selecting any category from the category dropdown list.
Once the categories and subcategories are defined you can now onboard restaurant on your platform and assign these categories and subcategories to them.
Restaurants
Setup Restaurant
First, you have to set up a restaurant from the admin panel, to register a restaurant/supplier on the platform.

Click on add restaurant to fill a form with required details like name, email, phone, address, and delivery modes
Delivery modes can be:
- delivery – In case of delivery you have to define admin commission for delivery orders
- Self-pickup – In case of self-pickup you have to define admin commission for self-pickup orders
- Both – In case of restaurant/suppler supports both delivery/self-pickup, we have to define both admin commission for delivery orders & admin commission for self-pickup orders
- One can also assign top level categories to the restaurant/supplier under which restaurant/supplier can define his/her subcategories and products

Once a restaurant/supplier is registered he/she will receive an email with auto-generated passwords.
After the restaurant is registered it shows on the list. You can view the basic details of the restaurant in the list like name, email, admin commission, and revenue generated and the option to disable the restaurant if you want to

Restaurant profile
Once a restaurant is registered, you can view or update its information like Basic details(name, email, phone number, admin commission, delivery charges), Geofence( serving area of the restaurant), Catalog(categories, subcategories, and products), Rating & Reviews, Configuration(preparation time, delivery time and store availability).
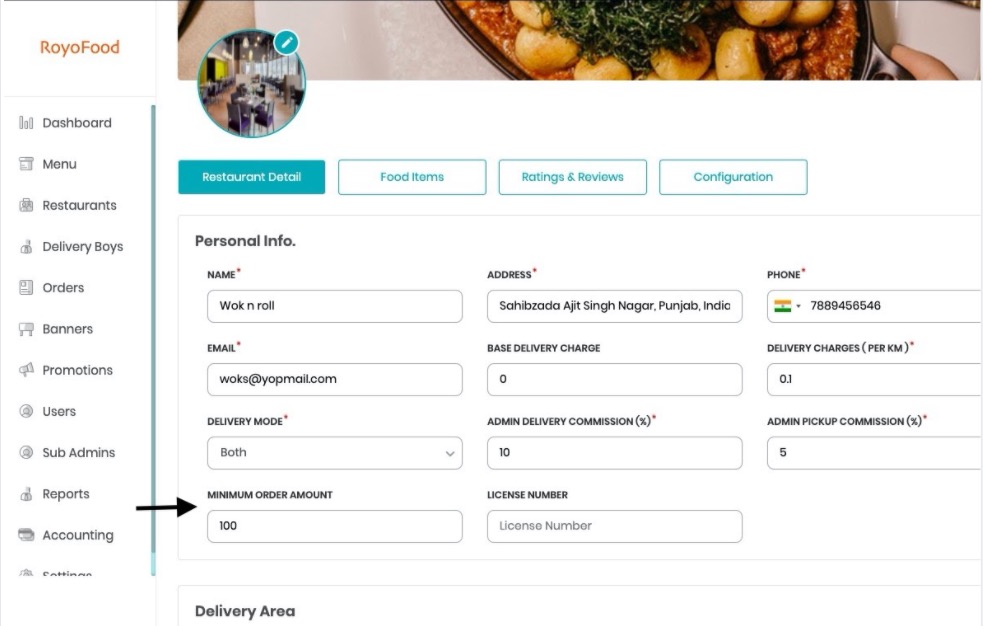
- Basic Details
Admin/Subadmin can view/update basic information like
Name, address, email, phone number, license number & admin commission (for both delivery and self-pickup orders), delivery charges, store image, store cover photo as well as can mark store enable/disable.


- Geofence
Admin/Subadmin can define the serving area of restaurant and also can view the same on map.
The serving area is defined as radius of the circle in kms inside which restaurant will b visible to the customers.


- Catalog
Inside catalog section(Food items), admin/subadmin can assign more categories/subcategories to the restaurant from the admin defined categories/subcategories or add new products inside category/subcategory.
3.1 Assign categories
Admin/subadmin can assign more categories or subcategories by selecting assign categories in the catalog(food items) section under restaurant details
How does it work?
To assign top level categories there is option assign categories that are not already assigned, you can also remove existing assigned categories. To assign specific subcategories you see checkbox inside subactegories of the category you want to assign and after selecting them press assign selected categories to assign selected subcategories to the restaurant.
3.2 Add Products(FoodItems)
admin/subadmin can add/edit product/food item inside a category/subcategory by pressing the “+” icon on the product list or edit the product by pressing the edit icon against that product.
Adding a product is a 3 step process


- First add the product name, available quantity, product image and description
- Set product price
- Add customization if any in the product (like the type of sauces) – you can different customizations(add ons). Each addon consist of name, whether its single select or multi-select and you can define the choices along with the price of each customization(addon)
- after adding you can view them in the list (all the customization belonging to that product) and edit or delete a particular customization
- Configuration


The configuration contains following options
- Delivery timings
Here admin/subadmin or restaurant can add/update preparation time i.e taken to process each order, and maximum & minimum delivery time required to deliver any order.
Order expected time is based on both preparation time + maximum delivery time - Time Slots
To define the availability of restaurant. The number of hours it is opened for and against each day. If for any reason restaurant want to close for any day due to any reason there’s a toggle against each day to mark in unavailable for that day.
4.

Drivers
In the drivers section, admin/subadmin can we the list of drivers available on the platform. A driver can be associated with a particular restaurant or available to all on the platform.
There is a toggle at the top by the name admin level to view the drivers that are available to all the restaurants, also you can filter drivers by restaurant and search them by name or email.

Add Driver
Admin/subadmin can add a driver by selecting the add Driver at the top right corner

To add a driver we need to provide basic details like name, email, phone number, address, occupation and ID No. plus information like the access i.e whether this driver is available to all restaurants or a specific restaurant & the driver commission(flat or %age) against each order.

Once the driver is added, it is available in the list where you can view all the details with driver commission and revenue generated till now. Other actions that admin/subadmin can perform over drivers:
- Enable/Disable a driver: There is a toggle available against each driver to enable/disable
- Edit the driver details
- Delete the driver: click on the more icon(…) against the driver to delete the driver
- Reset password for the driver: click on the more icon(…) against the driver whose password you want to reset.

Orders
Order section is where admin/subadmin can view all the orders(and their details) coming on the platform and the restaurant owner can view all his/her restaurant’s specific orders.
Order List
Orders section contains 3 tabs:
- Pending – All the incoming unaccepted orders come under this tab. Once admin/subadmin or restaurant owner confirms an order it moves to the active section
- Active – Once the order is confirmed order is moved to the active section. Here admin/subadmin/Restaurant owner can change the status of the order from confirmed to In the kitchen to Ready to be picked to On the way to Delivered.
The admin/subadmin/restaurant owner can also assign the delivery boy if not yet assigned.
- History – Once the order is delivered, the order moves to the history section.

Filters
Order list can be filtered on the basis of:
- Search – you can search order by order id, customer name, customer phone number
- Date – you can get orders between a specific date range. For eg, you need the orders from 1st April 2020 – 20th April 2020
- Payment Type – you can also filter order on the basis of payment type i.e either Cash On Delivery or Online
- Status – Once the order is confirmed. You can search for orders in the active and history section via order status as well.
In the active section, you can filter orders via status: In the kitchen, ready to be picked, On the way
And in the history section, you can filter orders via status: Delivered, Rejected, Customer Cancelled

List or Grid View
You can select the view you want to use for showing orders from grid or list view. Action buttons are available for both at the top right corner

The view shown here is grid view. Click on the list icon to get the list view.

List view is more detailed plus you can see more number of items in the list at once.
Order Details
You can view the order details: the products ordered by the customer, add ons included, their price, customer details, assigned driver details, the payment option used, the bill breakdown(subtotal, taxes, delivery charges)
Click on the order card in case of a grid view in the list or the order id in case of list view in order list to navigate to view the order details.


Order details is mainly divided into 5 sections:
- Basic order details: Order place at, order expected at, restaurant name & address from which products are ordered, driver assigned name & phone number, payment method used to place order.
- Products section: This section contains all the products that are ordered. The product name, the quantity of each product, add ons against a product if any and price of each product.
- Bill breakdown: This section provides the price breakup of the order, the subtotal i.e sum of individual products, taxes applied, and the delivery charges applied on the order.
- Customer details: The customer details like name, phone number, profile image and the address on which order is placed.
- Status update section: This section is present at the top right corner. Here you can perform various actions on the order. Like mark the order as confirmed, changes the status of the order from confirmed to in the kitchen to ready to be picked up to on the way to delivered.

Banners
What is a banner?
Admin/subadmin can add promotional banners for restaurants to help boost a restaurant’s reach. Banners are visible to the customer on the homepage of app and webapp and helps in directing customers to try out these stores.
How to add a banner?
You can add banners inside the Banner section on the side menu. Click on +Banner to add a new banner.

A banner is defined by:
- Banner name
- Restaurant name to which you want to assign the banner
- Category of the selected restaurant you want to assign
- Banner validity i.e start date and end date. The Banner will be visible on the platform under this period only
- Banner Image for both website(4:1) and app(0.9:1)

After the banner is added it is visible in the banners section and you can edit or delete any particular banner.

After the banner is added and is active i.e under banner validity it visible to the customers as long as the store with which it’s associated serves in the customer’s location. Shown below how they’ll appear in the customer website and apps


Promotions
In the promotions section, admin/subadmin can define the promo codes that customers can use on the platform to avail discounts.
How to add promo code
Inside the promotions section, click on +promo code to add a new promo code

A promo code is defined on a number of parameters:
- Available for :
1. All users: that is if this available to all the users on the platform no matter how many order each customer places
2. For first time user: once can use this promo code to target new customers in placing their first order by setting giving promo discount for new customers - Promo code name – Name used to apply the promo code
- Promo code description – describe why you created this specific promo code(maybe a sale day is coming or its a festival promo code etc)
- Promo discount: is of 2 types 1) percentage 2) flat
- Minimum basket value: the minimum cart subtotal on which the promo code is applicable
- Promo Bearer : is of 2 types
1. admin: that means the promo discount will be beared by admin
2. Restaurant: that promo discount amount will be beared by restaurant - Commission on: if of again 2 types:
1. Original price : that is promo discount is applied on sum of original product price(not discounted)
2. Discounted price: that is promo discount is applied on sum of discounted prices and not the sum of original prices. - Total number of voucher: total number of count that this promo code can be used on the platform
- No. of redeem allowed per user: that is how many times a single user can use the same promo code
- Promo validity: Define the start and end date of the validity of this promo code
- Select restaurants: Select the restaurants from the list on which this promo code will be applicable


After the promo code is added it will be available in the list which shows basic details of a promo code.

Other Actions
In the promotions section
- once can search the promo code by name
- filter them by validity period
- and based on its type whether it is available for all users or first time users

Users:-
Admin can view the list of all the registered users and can perform the following actions.

- Reset Password of a user

- Download csv of all user
- Verify OTP of a user
- Change number of a user

SubAdmins
Admin can create as many sub admins he want. Admin can grant permission to the sub admin.


Reports:-
In this we have following types of reports in the admin panel
- User reports.:- In this report, admin can see newly registered users on the platform. And can send notifications to the users. Admin can filter the data according to the date of registration. Admin can also download the report.


- Order reports:-In this report, admin can see all orders made by users on the platform. And can send notifications to the users. Admin can filter the data according to the date of order as well as status and restaurant. Admin can also download the report.


- Restaurant reports:- Admin can view the revenue of the restaurant, and the orders they have received. Admin can download the csv reports.

- Driver report:- Admin can view the drivers report, in terms of order they have served. Admin can filter the admin drivers and their reports. Admin can download the cvs reports


Accounting
Admin can view this accounting section.
Account statement
Admin can view the accountancy statement, i.e. the amount they have paid or settled with the restaurant. Admin can download the reports in csv format

Account settlement
Admin can view the online orders or cash orders accountancy in this section, and can select orders and pay the amount to be given to the customer. Admin can download the reports in csv format


Admin can filter according to the payment status.

Settings:-
In this section, if god panel enables any feature then it is shown over here. Those section is explained in God Panel part. Apart from that below are the sections that are there for all the clients.
Basic:-

In this sections following options are there.
- Cosmetic Settings
- Logo
- Favicon
- Theme color
- Element color
- Header color
- Header Element Color
- Placeholder
- Location Page Background Image
- Web
- App
- Empty Cart Image
- Web
- App
- Orden Loading Screen Gif
- Web
- App
- Login Image:- In app
- Delivery Image : This is on home screen of app
- Pickup Image :- This is on home screen of app
- App Pickup Screen Banners
- Location Page Background Image
- Cancellation policy:-
In this the admin can customise its cancellation policy. Admin can mark the status in which the order will receive the full amount and in which they will receive partial. The amount received is also customisable. This is also time bound that if the user cancels within a time period then full refund will be given.

- Other settings
- Referral Amount For Sender :- This is the setting for amount received by the users , when a person register with his referral code
- Referral Amount For Receiver :- This is the setting for amount received by the users , who registers with a referral code
- Payment Method :- This have two options
- Cash on delivery
- Online Payment
- Waiting Charges Per Minute
- Email :- Support Email
- App Sharing Message:- This message is displayed in app to be sent to other user for sharing the app

Default Address
This is the default address that if defined user will bypass the address screen
Email Setup
In this admin can send email to all or selected users

Notification setup
In this admin can send email to all or selected users

Privacy policy, tc
In this the admin can define the privacy policy, about us , terms and condition and faq

